I ran across this post on the ADC fine art blog today and even though I do things a little differently I thought it would be a good thing to share.
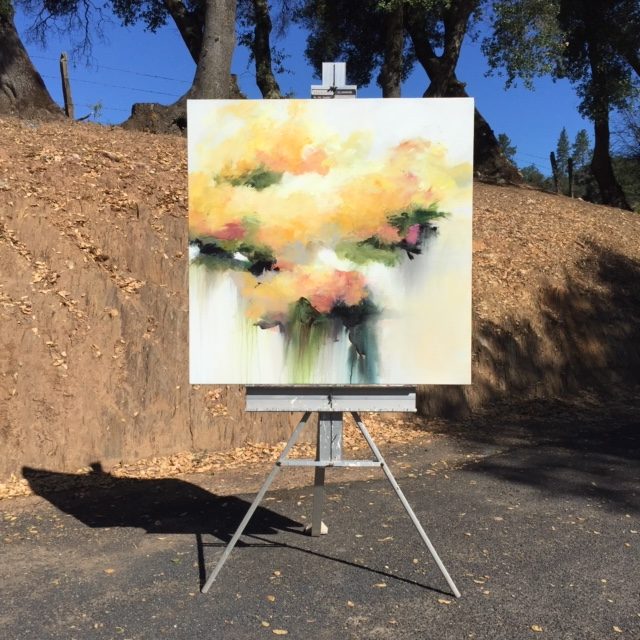
I use an inexpensive aluminum easel outside and shoot on a sunny day. I position the easel at about a 45 degree angle to the sun and take the photo before the finish coat goes on. You can adjust depending on the time of day or year. The photo above shows the simple set up but when I shoot the picture I shoot at the highest zoom I have in raw format and fill the screen.
Here is a copy of the blog post from ADC. Their link is: https://www.adcfineart.com/blogs/news
I’ve spent a lot of time on this blog talking about how important your image is as an artist. Every single aspect of how you present yourself speaks volumes to collectors, buyers, interior designers, and gallery owners. You don’t often get a second chance to make a first impression. And in the digital world we are operating in, often, the first impression you give is the only one.
Whether preparing an entry for a fine-art competition, selecting images to present online (your website, social media, email blasts, etc.), or putting together a portfolio to impress gallerists, you need to know how to take great photos of your artwork. If not, with a click of a button or a swipe of your hand, a person can easily pass by your artwork if it isn’t professional looking.
We see hundreds of portfolios each year here at ADC, especially as a juror for Art Comes Alive, our annual art competition and exhibit. And we can tell within seconds that the artist took the time to photograph their work properly. If your work reveals bad lighting, shadow, overexposure, underexposure, too much contrast, too little, or too much tint, you’re hurting your chances for your pieces to present well and ultimately sell well.
I put together a few photography guidelines so that you can photograph your artwork like a pro!
Knowing how to photograph your artwork can make all the difference when it comes to acceptance into an art show, winning over gallerists you would like to sell your work, or impressing your followers and clients through your own marketing efforts.
Ultimately, the best approach is to hire a professional photographer. Of course, not everyone has the budget or resources to do so when it comes to photographing artwork. I am going to share just a few tips to photographing and editing that you can do in your studio so that it sets you apart from other artists.
Getting ready to photograph your artwork
Tip 1: Use the right equipment when photographing your artwork.
Most digital phones now are equipped with excellent, professional-grade features. So if you don’t have a professional camera, don’t worry. That being said, if you are using a digital camera, make sure the camera you use does have some features—white balance settings, F-stop (aperture settings), ISO, and the ability to turn off a flash. Also, make sure it has a minimum capacity of 5 megapixels. If you can shoot in a “Raw” setting, all the better. You’ll also want to employ the use of a tripod so that there is no movement of the camera while you shoot. Make sure your white balance is set to the appropriate setting based on the lighting you are working with that day (daylight, overcast, etc.), then make sure the aperture (F-stop) is set at or around an 8 (or a landscape setting). Finally make sure the ISO is set to about 100, so the details of the picture remain intact.
Tip 2: Set the scene before you photograph your artwork
Pay attention to the way you’re positioning your artwork. If it’s a canvas work that can be hung on the wall, you’ll take the photograph straight on. But if the artwork needs to rest against a wall at an angle, then make sure you’re shooting your camera from the same angle (this is where a tripod comes in handy).

Keep your background as simple as possible and use a neutral color. Of course, white is the preferred background color when photographing artwork as it makes the editing process easier.
Tip 3: Photograph your artwork in the perfect light.
Lighting is everything. Depending on the weather some artists prefer to photograph their work outside during an overcast day. The best place to shoot your work indoor is usually by a window where there is diffused natural light, but not directly in front of it. You never want to photograph your work in direct sunlight.
If the weather isn’t on your side, you want a more controlled environment for consistency across all works, or if you’re burning that midnight oil for a last-minute art deadline, you’re going to need to set up a lighting kit. I know photography equipment can get expensive, so we found this great video on DIY lighting tips for under $100.00!
Tip 4: Save and edit your work.
Once you’ve taken your photos, you’ll want to upload them to your computer and begin to edit them. If you use a Mac or a PC, they both have photo-editing software, which are perfectly acceptable to use. However, if you have Adobe’s Photoshop or Lightroom, I highly recommend using either one of these photo-editing software programs, because of their advanced features.
What to do after you’ve taken a photograph of your artwork
Now that you’ve photographed your artwork, there are still a few extra steps you must take to ensure your images really stand out.
Crop and resize your photos accordingly.
If you have shot work with white or wall space around the picture, that’s okay. You can crop it by cutting out the areas around your photo. You may also need to make copies of it and resize it with different sizes and resolutions based on your needs. If you’re uploading your photos to a website or on social media, you need to pay attention to the size of the file. If the file is too large, it may not load properly. You’ll want to resize the pixels (px) to on or around 1000 px x 1000 px, or if it’s a landscape work, about 800 px x 600 px. However, if you are going to blow up the photo or are using it for a full screen, you can leave it at a larger size.
Another thing to think about is dpi or dots per square inch. If your photo is set too high, a dpi may take too much time to load on a website. (If an artist sends me a website portfolio and it takes too much time to load, I usually don’t wait. So be sure to test how quickly your pages load.) However, that being said, you don’t want the dpi to be so low that the pictures are blurry. You may need to play with these settings a bit to see which ones work on your website, but a rule of thumb is about 72 dpi for the web.
Perfect the color, exposure, and white balance of your photos.
One of the best ways to determine whether the camera captured the picture perfectly is to hold the artwork up next to the computer. Do the colors match? Are the whites the same color on the screen as they are in the artwork? Are colors as saturated on screen as they are in real life? Is the picture too dark or overexposed? All of this can be adjusted in a photo-editing software program.
It takes time and practice, but I assure you a high-quality photo of your work will help set you apart.
Optimize your images for SEO
If you’re photographing your artwork to upload to your website, this is a critical step. Optimizing your images for digital use helps you rank higher in Google search results. I go into more detail in this blog, but essentially you want to be using descriptive file names and making use of “alt tags” on your website.


 Scroll To Top